All posts by Aric Pearson

Care and Maintenance of Your Flute

Good care and routine maintenance of your flute can insure a lifetime of playing enjoyment. Please carefully read the following to make sure your flute performs at its peak:

Jewelry

Jewelry is a common cause of damage to flutes, especially rings. Some of this damage may not be able to be repaired, particularly to the surfaces in and around the embouchure hole.

Assembling your flute:

  1. Grasp the body at the barrel joint with one hand and the footjoint at the bottom below the keys with the other hand. Put the pieces together with a twisting (not rocking) action.
  2. Grasp the headjoint below the lip plate and once again use a gentle back and forth twisting action to fit the body of the flute to the headjoint. Some technicians recommend turning the headjoint onto the barrel only in a single direction.
  3. Most flutes are designed to be played at A = 442 with the headjoint pulled out 1/8″, but this can be adjusted to your preference.

Swabbing the inside of your flute:

Most professional flutes come with a wooden cleaning rod. You can extend the life of your pads and reduce instrument maintenance by swabbing out your flute with a soft, absorbent cotton cloth after each time that you play.

Fingerprints can be removed by using a microfiber cleaning cloth. Do not use cloths that have been infused with a silver cleaning chemical as these powders can work their way into the mechanism of the flute or onto the pad surfaces. While we do not recommend using silver polish, some players wish to. Use silver polish only with extreme care and never use it on or around the mechanism or pads. Your instrument is best stored in its case when you are not using it. Keep your case clean, and do not store accessories inside the case.

Straubinger pads and their care:

Your flute may have factory installed Straubinger Pads. You will find that these pads will stay in adjustment much longer than ordinary felt pads.

As you clean your flute be careful to stay away from the edges of the pad and key cup. The edges of the Straubinger Pad are very firm and hard and are susceptible to wear if their edges are rubbed frequently.

If you choose not to send your flute back to us for service, we suggest that you work with a technician who has been authorized by us or by David Straubinger to perform the service on your instrument. Call us for a referral to a Lyric Authorized Service Center near you.

Recommendations for maintenance:

Your flute should be cleaned, oiled and adjusted (termed a COA appointment) approximately once each year by a qualified flute repair technician. To make an appointment with us or to locate the nearest authorized Lyric repair center, please call 1-800-967-6733.

We will make any adjustments to your new flute free of charge for 6 months from the date of purchase. This does not apply to instruments which have been adjusted without direct authorization from us. This offer excludes repair work due to accidental damage or misuse.

Return to Articles >>

Inline vs. Offset G

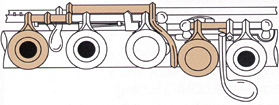
For many years, inline G was perceived as “professional” while offset G was associated with “student” flutes. While these stereotypes no longer exist, there is still some debate over which design is superior.

Inline G

Although inline G and offset G are the same acoustically, inline G may be the best choice for players with longer fingers or larger hands with adequate strength and control. However, due to increasing awareness of tendonitis and carpal tunnel syndrome, an ever-increasing number of players are now choosing professional flutes with offset G because of the more natural hand position it provides. In addition to the therapeutic advantages, there are technical benefits to consider with offset G keys.

Offset G

Offset G keys eliminate potential problems that can be encountered with inline G flutes. The inline G design has many left hand keys on one steel. This can make simple procedures awkward such as leveling pads, straightening key cups or refitting keys. Also, stress placed on this single left hand rod by the player or during repair can lead to a bowed or bent rod rendering it more susceptible to binding than the offset G.

With offset G flutes, the G keys are positioned on a separate steel or rod. The added strength of two or more supporting posts provides stability and protection to the left hand keys, leaving them less vulnerable to damage. In addition, a professional technician can isolate any problem without affecting the other left hand keys.

In recent years there has been a widespread trend toward offset G. With such advantages to the player and technician, this is an inevitable outcome.

Return to Articles >>

How You Can Clean Your Sticky Pads

Sticky pads are a common problem among flutists. Sticky pads are caused by dirt and oils which settle onto the pad and the tonehole surfaces. A number of steps can be taken to prevent and alleviate this problem.

The best way to avoid sticky pads is by prevention. This is done by minimizing the introduction of dirt and oils to your flute. Some flutists have a natural body chemistry which results in very high concentrations of acid in the saliva and skin oils. As a precaution, wash your hands thoroughly before playing to reduce the natural oils on the hands and fingers. In addition, brushing your teeth before playing will prolong and protect the life of your pads.

Cleaning of your flute after each playing session is another way to extend the life of your pads and to help prevent sticky pads. Swab the interior of the flute after playing, using a wooden cleaning rod (to prevent scratching the inside of the flute tube) and a 100% cotton cloth. Be sure to avoid “pad saver” types of swabs; while they can clean the tubing well, they are designed to be stored inside the flute tube. This holds moisture against the pads and does not allow them to dry properly. For the exterior of your flute, use a clean, dry cloth to gently wipe fingerprints and oils from the surface of the flute. A microfiber cloth is ideal, while cloths treated with chemicals can actually cause problems with time. Store cleaning cloths outside your flute case and launder your cloths regularly.

Despite such precautions, flutists may still encounter sticky pads. Cleaning your own pads can provide good results, but it must be done carefully to avoid harming your pads.

To effectively clean sticky pads, cigarette paper may be used. Avoid using gummed paper. If only gummed paper is available, cut off the gummed section before use.

  • Place a clean sheet of paper between the pad and tonehole.
  • Gently press the key cup down against the tonehole.
  • Carefully pull on the paper once or twice in extremely small increments to transfer the dirt or oil to the paper from the pad and tonehole.
  • Do not pull the paper completely out—this will cause wear and tear on the pad skin.

If the stickiness persists, repeat the procedure with a fresh piece of paper while pulling in a different direction. Care must be taken to avoid overuse of this technique. With frequent use, the friction of the paper being pulled repeatedly over the pad can wear and eventually tear the pad skin. This technique should be used once a week at most, preferably once a month.

Annual routine maintenance by a professional technician is an important step in pad care. During routine maintenance, your technician will disassemble the flute and clean the pads and toneholes. The condition of the pads will also be checked. Worn or dirty pads will be replaced.

Routine professional maintenance paired with diligent care and cleaning will help to extend pad life while alleviating sticky pads. For more information on caring for your flute pads contact us to schedule maintenance with our professional repair staff.

Return to Articles >>

Overhauls

While flutes require annual routine professional service to maintain top playing condition, a complete overhaul is necessary typically every five to ten years. Pads gradually become dry and lose their flexibility over time. Older pads can be leveled or adjusted by a technician, but they may shift back to their original position, quickly bringing the flute out of proper adjustment. Felts, corks and bumpers also wear over time, bringing about mal-adjustment and overall key noise. Key fit is extremely important to the stability of adjustments and to minimize key noise. With normal use, keys wear over time and must be carefully refit to maintain a reliable mechanism. The overhaul process is extensive and concentrates on all aspects of the flute to return it to proper playing condition. The following are the steps involved in a full overhaul:

Mechanical Aspects

  • All accessible dents are removed.
  • Tenon fit is checked and adjusted if needed or requested.
  • Soldered toneholes are checked for leaks.
  • Toneholes are leveled by hand to provide an optimal surface for the installation of felt pads.
  • Any mechanical problems are addressed and repaired.
  • The entire mechanism is refit (swedged) by hand to tolerances of less than .001 inch.
  • Any swedging marks are removed by hand with polish paste.
  • Stainless steel springs are replaced and balanced as necessary.

Cosmetic Aspects

  • Headjoint, body and footjoint tubing is washed and treated with a mild Tarnex solution.
  • Tubing is polished to a high finish by hand using polish paste.
  • If the tubing is solid silver, minor accessible scratches may be removed by hand polishing. (Machine polishing, or buffing, is not recommended.)
  • The mechanism is depinned, washed and treated with a mild Tarnex solution.
  • The mechanism is carefully hand polished with a polish paste.
  • Mechanism hinge rods and inner hinge tubings are polished and cleaned.
  • Pad retaining rings are cleaned, polished and refit if necessary.
  • Pad washers are cleaned and polished.

Padding and Final Assembly

  • All bumpers and regulation shims are replaced with felt bumpers, leather and cork as dictated by the individual keys.
  • The mechanism is realigned to the toneholes as necessary.
  • New pads are installed using the highest quality premium felt pads.
  • Pads are meticulously leveled by shimming to tolerances of less than .0005 inch. (Keys are not bent to level pads unless a repair is being executed.) No seat is inserted into the pads.
  • The mechanism is precisely adjusted for a quick, accurate response with the lightest touch.
  • A new headjoint cork is installed.
  • The flute is play tested to check for proper response, tone, resonance, pitch and consistency throughout the registers.

A professional overhaul is an important investment in maintaining the value and reliability of your flute for years to come. We are proud to offer the finest in professional service. Our experienced staff of technicians perform overhauls of the utmost quality with outstanding customer service. Please contact us to schedule an overhaul with our skilled technicians.

Return to Articles >>

What Are The Best Springs For My Flute?

The materials that flutemakers use for springs have undergone an evolution, particularly during the past 25 years. The advancement in spring materials reflects the flutemaker’s progress toward the most responsive and reliable material for use.

For many years, the only springs available on a handmade or professional flute were that of gold alloy. The only other alternative during this time period was a spring made of phosphorus and bronze. At this time, many machine-made flutes were equipped with phosphorus and bronze springs due to their low cost. These springs, however, were less reliable and effective than springs of gold alloy as they lacked the tensile strength of gold. *Note: gold springs are an alloy, a mixture of metals. Pure gold is too soft to be used as a spring.

The purpose of a spring is to provide quick response, with a consistent and reliable touch and feel when pressing and releasing a key while playing. As flute making evolved, stainless steel springs replaced those of phosphorus bronze. Japanese flute manufacturers introduced the first flutes employing stainless steel springs. Today, stainless steel springs are the most prevalent spring in use by flutemakers worldwide. Stainless steel is much stronger and has more tensile strength than any other spring material in use. This tensile strength is what allows technicians to provide a player with extremely light spring/key action while still providing for a quick “positive” feel. Springs with less tensile strength can result in a more “sluggish” feel to the action of the keys. Stainless steel springs can be strengthened or weakened with much more variation and subtleties, therefore achieving a custom feel of strength for each individual player. Springs made of stainless steel also maintain their strength and stability over a long period of time.

While spring materials have no impact on the quality of tone in a flute, they do influence action and response of keys. Quick, consistent response of the mechanism is imperative for a comfortable feel and complete reliability in the function of your instrument.

Return to Articles >>

The Split E Mechanism

The flute has progressed over the years with regards to scale, pitch and response. Many modern flute makers employ new manufacturing techniques to ensure that all notes are stable and true to pitch. For many flutists, the third octave E natural can be challenging. Depending on the individual, this note may not be as stable as others. The split E mechanism provides a reliable solution for flutists seeking to improve the response of their third octave E.

Split E Mechanism

The Split E mechanism can dramatically improve the response of high E. This mechanism divides the action of the upper and lower G keys, permitting the lower G key to close when high E is played. Closing the lower G key and fingering high E decreases venting and brings more stability to the note with a faster response. This mechanism employs a separate rod, adding a slight bit of weight to the flute. The split E mechanism must be made on the flute during manufacture.

Return to Articles >>